Overview
You will be working with your first Java programs, and learning how to navigate in the Eclipse framework.Objectives
- Familiarizing yourself with the Windows and Eclipse work
environment
- Works towards the following Course Goals:
- Competency with using basic coding features of a high-level imperative programming language
- Competency with writing computer programs to implement given simple algorithms
- Familiarity with designing simple text-oriented user interfaces
Exercise 1 Description
Getting Started
In this lab we will be walking through the steps needed to create a new
Java project. For this course we will be using the Eclipse
IDE. An IDE (or Integrated Development Environment) is a
combination editor and run-time environment to develop and test
software programs as they are written. The Eclipse IDE is built
for use with the Java programming language.First you must set up a new Eclipse icon on your desktop by following the instructions you will find at this link. You only need to do this once. DO NOT USE THE LINK THAT HAS BEEN PROVIDED FOR YOU ON THE DESKTOP. The link on the desktop is not guaranteed to work the same way in Baker 310 as it does in Caldwell 112 - you will need to create a new link to ensure that you will be able to use Eclipse in either lab.
Once you have created a new link, double-click the Eclipse icon to start Eclipse. You will be shown the Eclipse start-up splash screen and then you will be presented with a window like this:
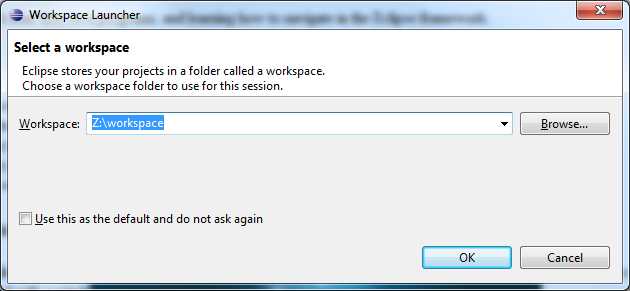
Enter a name for your workspace here (on the lab machines use U:\CSE\workspace on your own machine put it somewhere you can find it. Note that if you are using a MacOS laptop you should NOT use colons or slashes in the name of your workspace folder - just name it "workspace") and click the OK button. You will then be presented with the Eclipse program window:
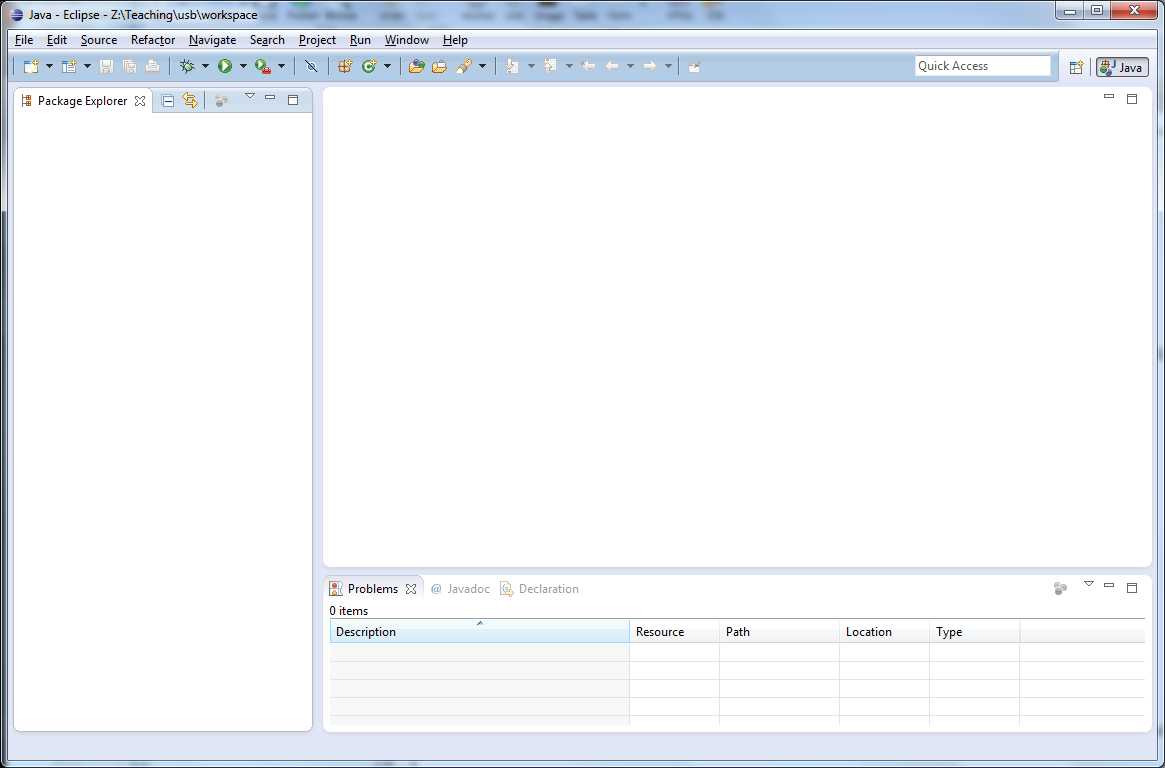
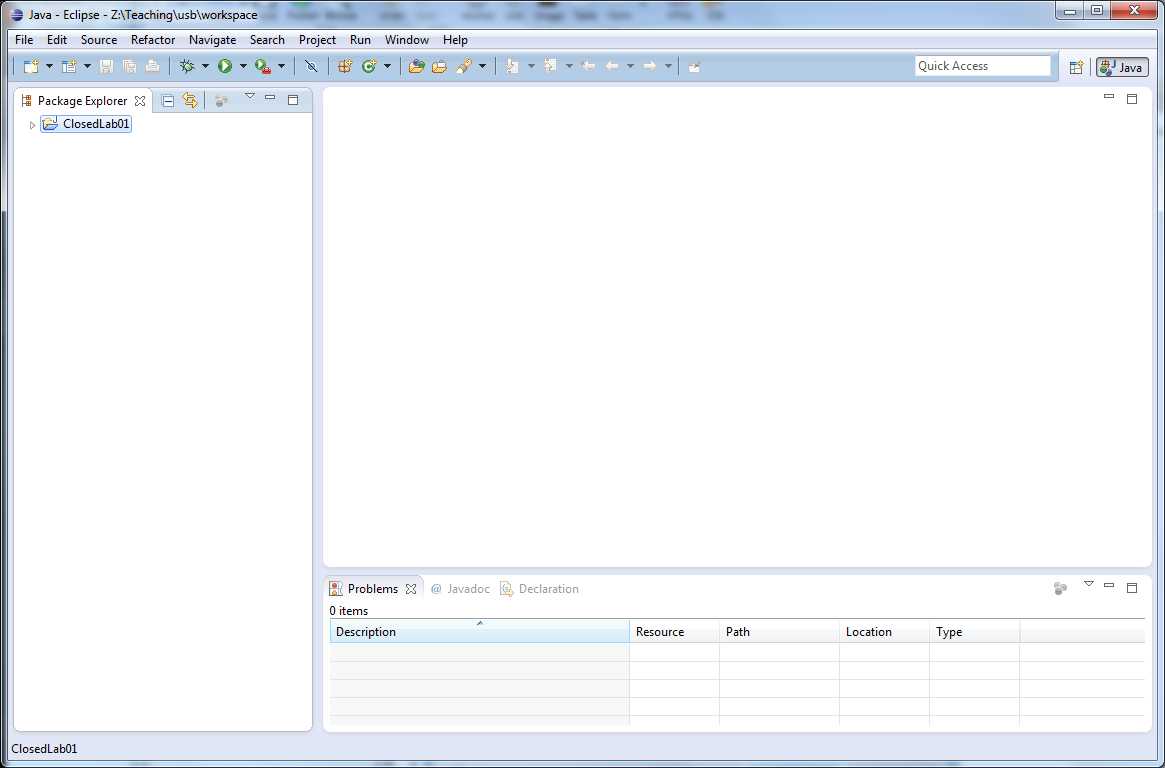
This window is the main Eclipse development window. On the left-hand side is the Package Explorer. This window shows all of your Java projects and allows you to navigate to specific files in each Java project. Right now you should notice that it is empty - it contains no projects. For each of the Closed Labs and Projects that you do in this class this semester, you will need to create a new Java Project. So let's do that next.
To create a new Java Project, select File -> New -> Java Project. You will be prompted to enter some information about your Java Project:
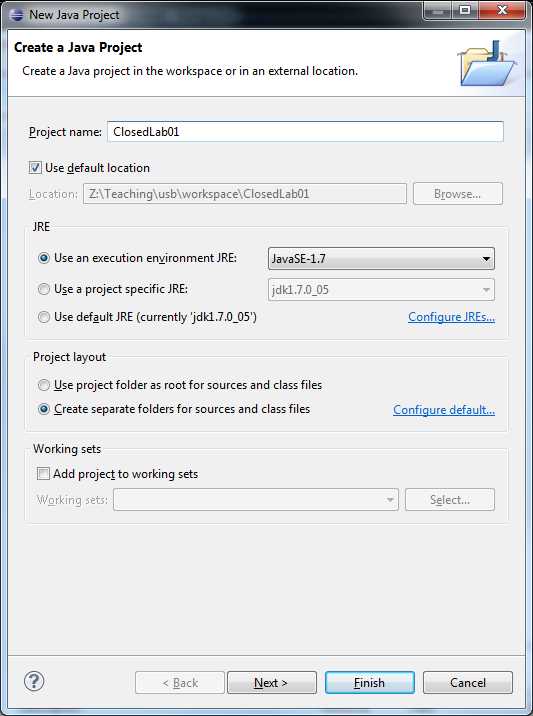
Enter ClosedLab01 in the "Project name" box and click the Finish button. This will create a new Project in the Package Explorer.
The "arrows" next to the various Project elements allow you to expand those elements and see what's inside. Expand the ClosedLab01 Project to see what we have:
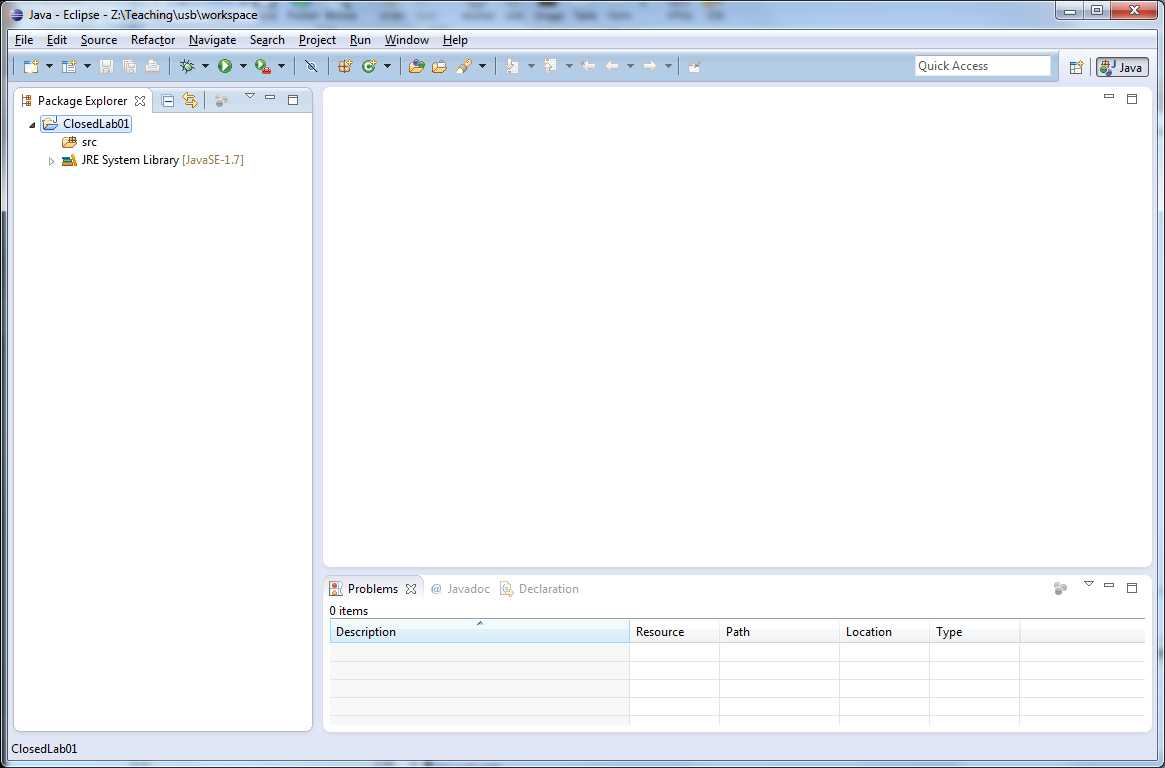
There are two elements in our ClosedLab01 Project - a directory (or folder) named src and a library named the JRE System Library. The System Library contains all of the "default" Java tools that come with the base language, and we will be exploring examples of these throughout the upcoming semester. For now, we are going to concentrate on that src directory.
src is short for "source" - this is the directory that holds all of our programming source code. Right now it is empty. Let's create a new Java program that will be added to our source code folder.
Select the ClosedLab01 directory in the Package Explorer and then select File -> New-> Class (or right-click on the src folder and select New -> Class). A dialog box will appear asking you to enter some information about your new class:
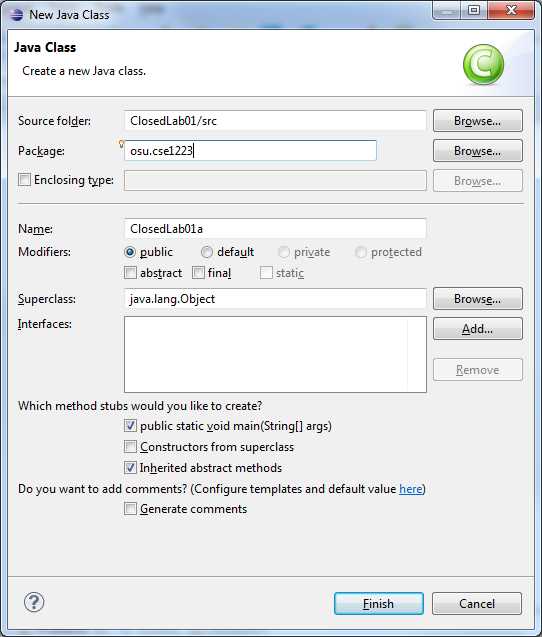
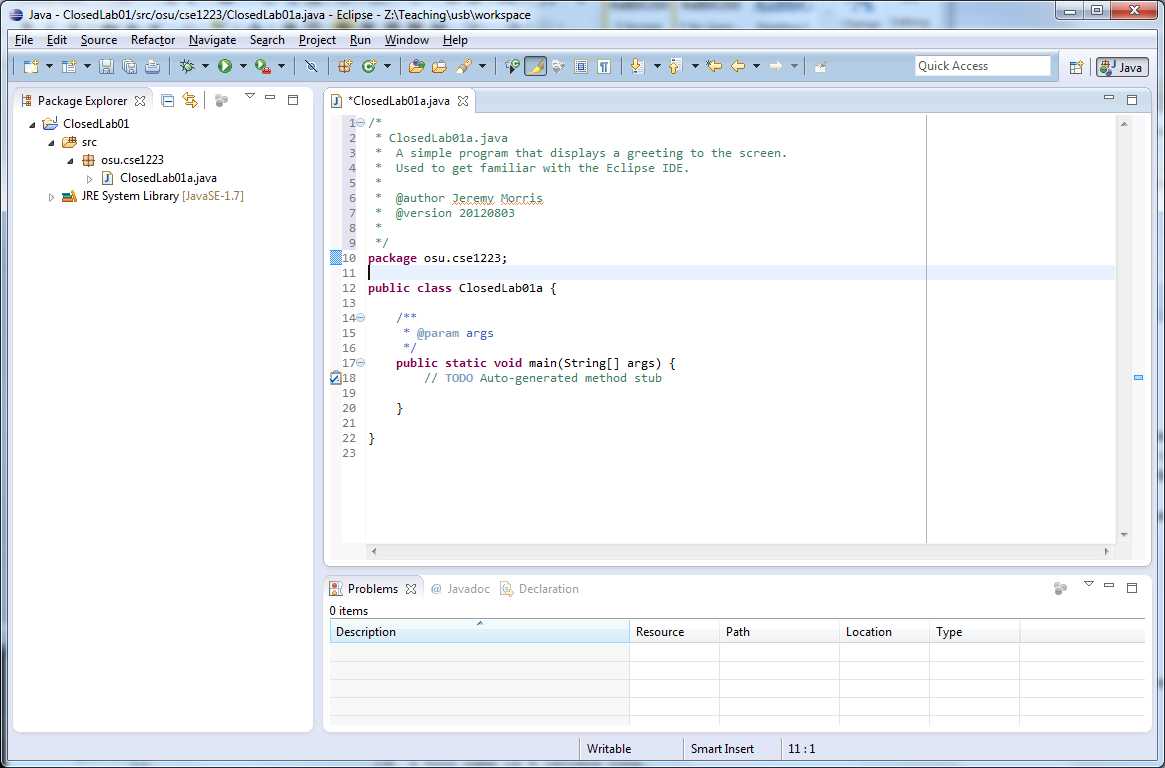
The important prompts here for you to enter are the Package prompt and the Name prompt. Every Java program has a name that can be used by the operating system, the Java virtual machine and by other Java programs to access it. For this course the name of a Java program will always be related to the Lab or Project we are working with (so this first exercise is ClosedLab01a). The package is used when we want to allow other Java programs to access our code as a shared library. We won't be worrying about that in this class, and we could put everything in the "default" class. But that is considered to be poor form, so for our labs we will use "osu.cse1223" as our package name. Enter those values into the appropriate prompts. We also want to check the option for Eclipse to create a public static void main(String[] args) method stub for us. Check that option and then click the Finish button - Eclipse will create a new Java program for you and open it in the editor window:
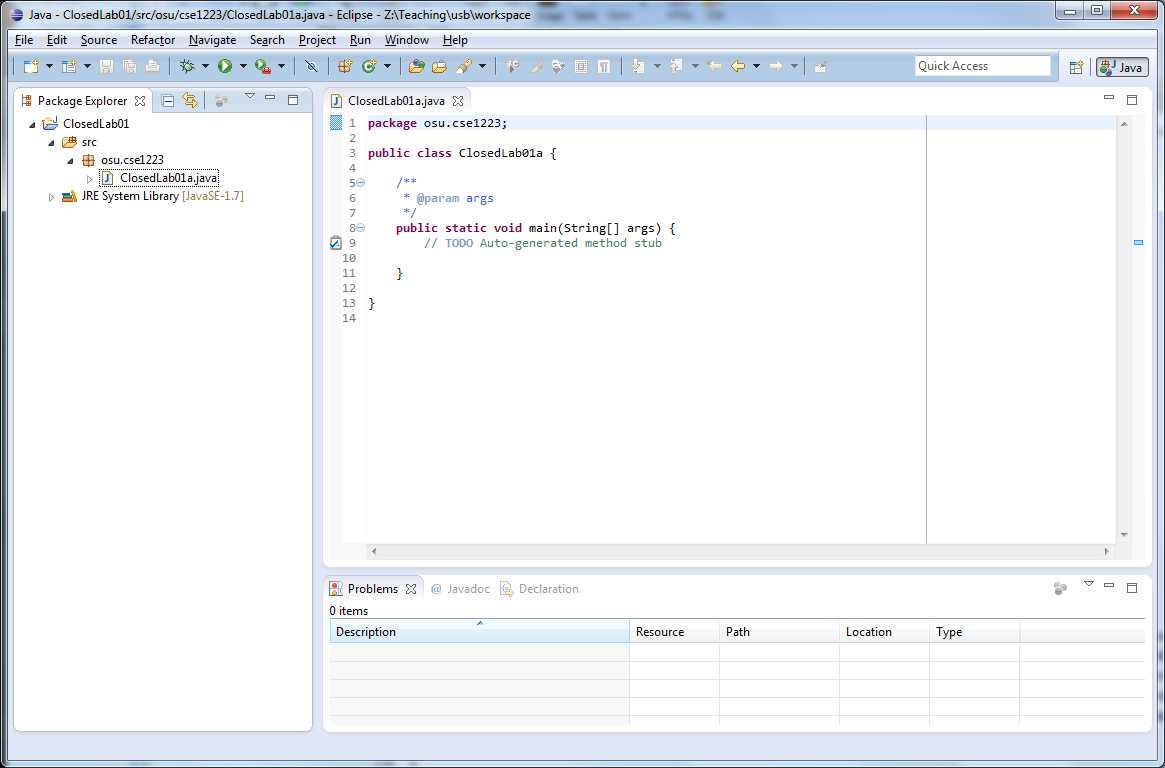
You now have the "skeleton" of a Java program ready for you to modify.
Editing Your First Program
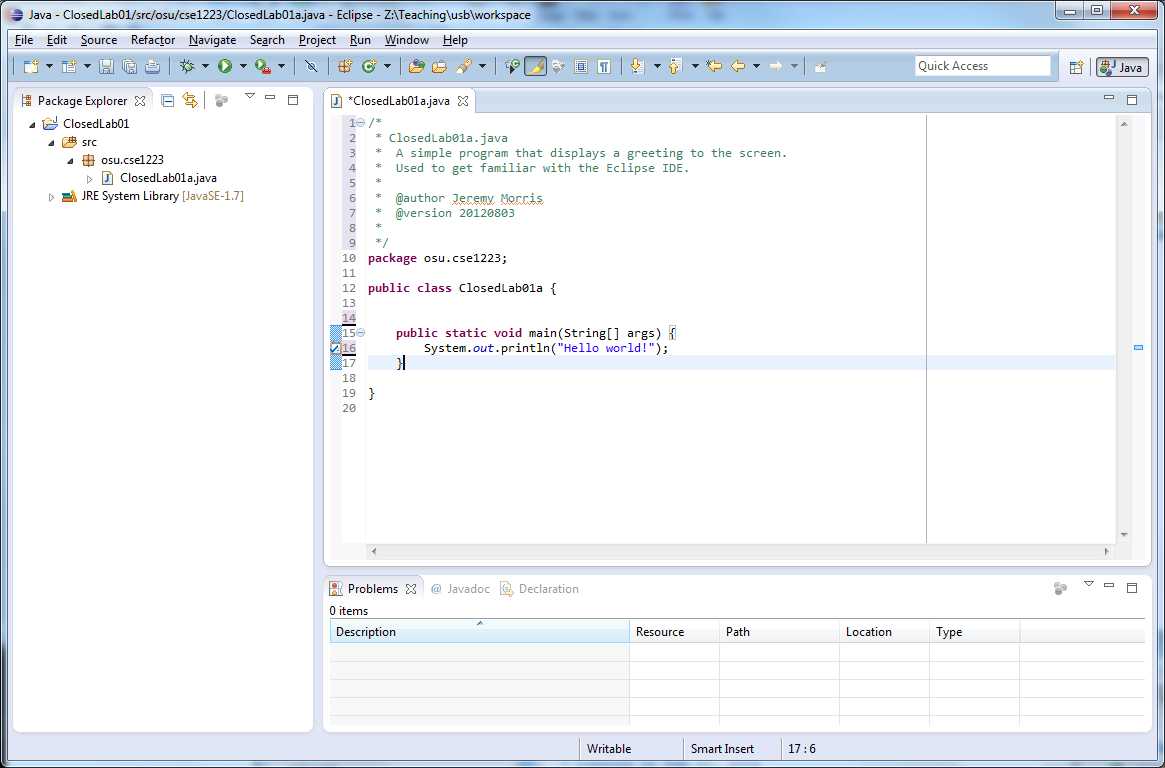
The very first thing you should always do with your code is to add a comment block to the top of your program file. Comment blocks are used to put English-language text into a program - they are a way for programmers to leave notes for themselves or for other programmers about what a piece of code does or why a particular choice was made. Learning to leave the right amount of commentary for your fellow programmers is a skill that all programmers need to learn, and it will be required that you comment your code properly in this class.For the comment block at the top of the file (also known as the program header), we will use a specific commenting format. Here is the code window above modified with a comment in the proper format for this first lab assignment:
Comments are indicated by blocking of the code with the characters /* ... */, where everything between the asterisks is a comment. Comment blocks are "freeform" - once you mark something as a comment the compiler will ignore it - so we can use any format we want for our comments. In this class, our comments will use the specific format outlined above. The comment block above uses a format known as Javadoc, which in more complex programs allows for the automatic generation of documentation from the comments in the code. Here we are only using two Javadoc tags - the @author tag to tell us who wrote this program and the @version tag, which should give us the date the program was written. The comment above indicates that this code was written on August 3rd, 2012 (YYYYMMDD format for the date). If there is more than one author, all of their names should be listed on the same line.
In addition, the program header gives us two other pieces of information. The first is the name of the program on the first line of the comment, followed by a short few sentences describing the overall goal of our program. This should be a short summary - we can comment the individual blocks of code as needed later if the summary needs more explanation.
Now we want to add some Java code. Edit your program so that it looks exactly like the following (apart from the date and author, which should match YOUR information):
Then select File -> Save (or click the save button on the toolbar - the third button from the left that looks like a floppy disk, if you know what a floppy disk is). Congratulations! You've now written your first Java program.
Running Your Program
Now that you've created your first program, it's time to run it. Select the source file ClosedLab01 in the Package Explorer and then select Run -> Run from the menu (or click the Run button on the task bar - the green circle with the white arrow in it).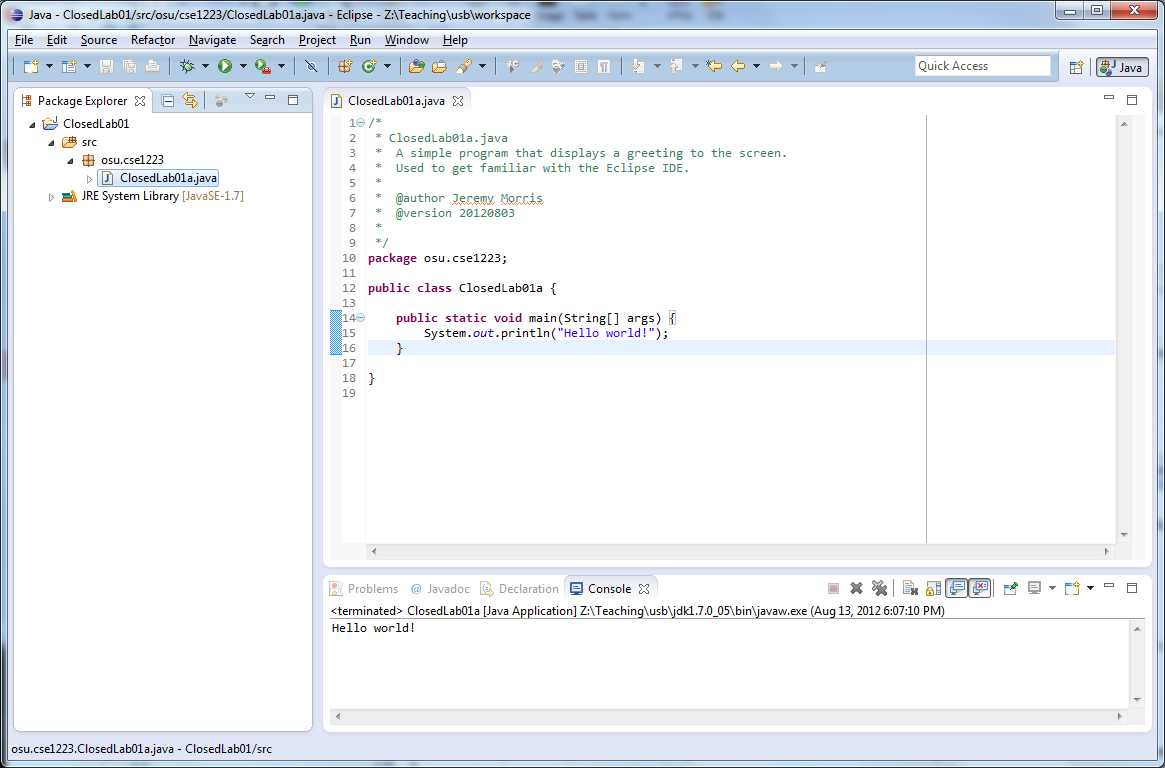
The Console window will open up at the bottom of the screen. In this window you can see the output of your program above. We asked it to print "Hello World!" and so that shows up in the console window. Most of the programs for this class will make use of the console window for input and output, so get familiar with it.
Congratulations! You've now run your first Java program in Eclipse! As you use Eclipse you will discover that there are many more features and useful elements to the IDE, but the basic steps above are most of what you will need to use Eclipse for CSE 1223.
Exercise 2 Description
Importing Files Into Eclipse
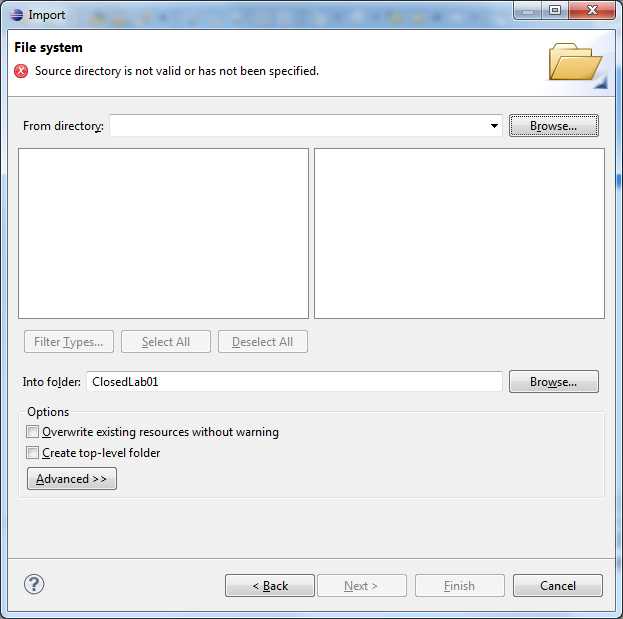
For some of the labs in this course, you will need to import a file into a Java Project. Let's work through an example of importing a file into our ClosedLab01 project. First click on the link and download the file to your machine (make sure you note where the file was saved):Next we will import that file into our Java project. Select the osu.cse1223 src folder and then select File -> Import from the Eclipse menu bar. The Import dialogue box will appear
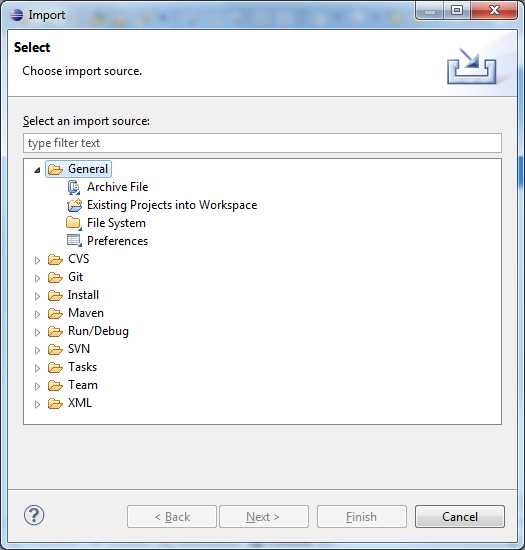
Select General -> File System and then click the Next button. A File System dialogue will appear:
You will need to Browse to the directory you downloaded the file above to. Click the top Browse button, find the directory you saved your file to, and click the OK button. Your Import window should change:
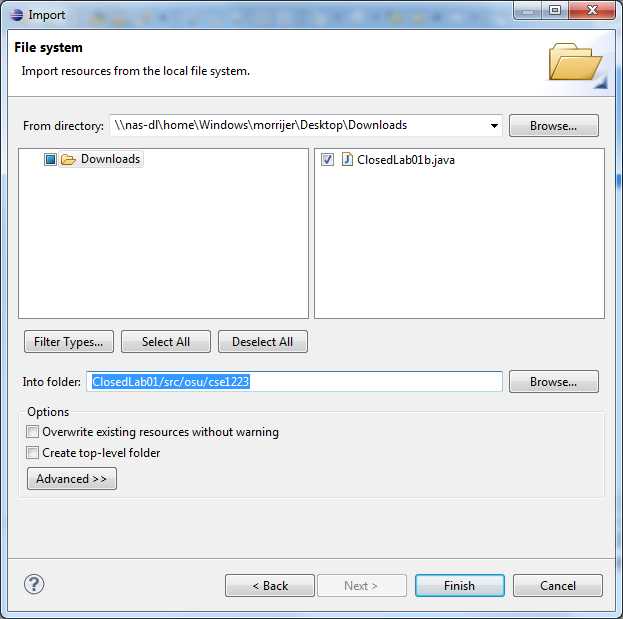
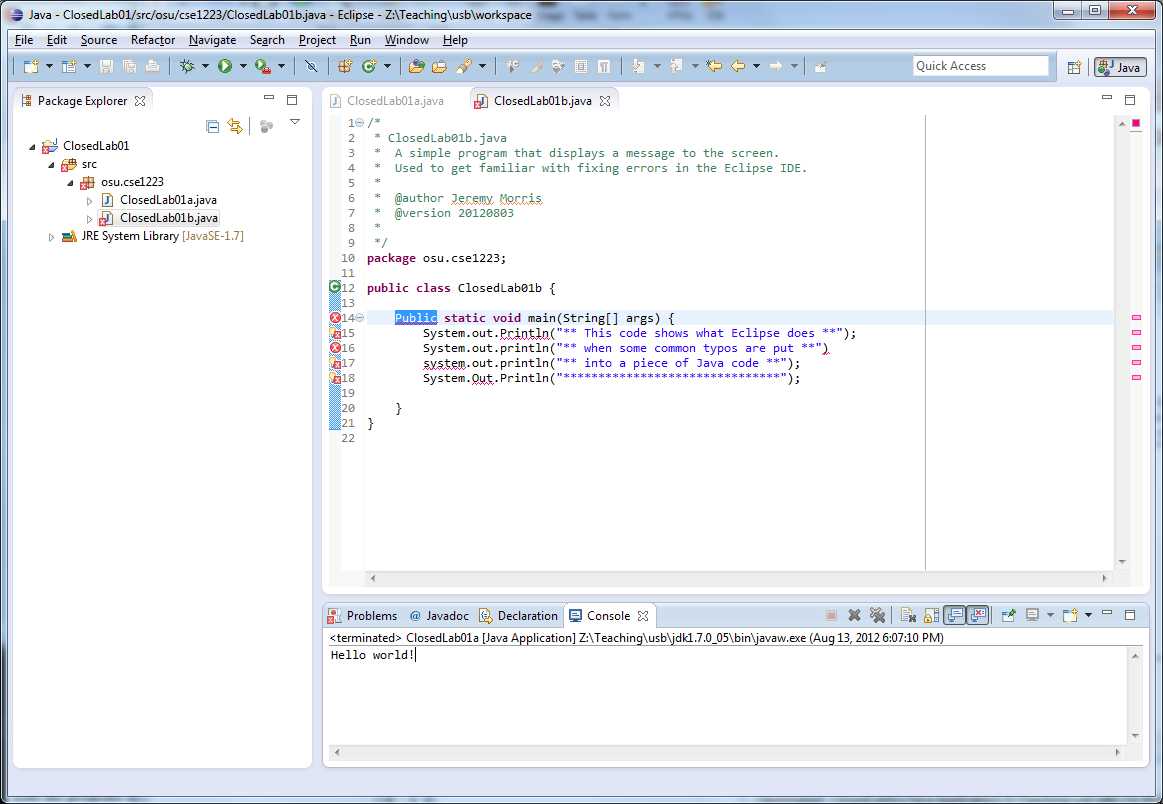
Check the box next to ClosedLab01b.java and make sure that the Project folder in the Into Folder entry reads ClosedLab01/src/osu/cse1223. Then click the Finish button. Your file will be imported into the right place in your Package Explorer tree. Double-click on it to open it in the editing window:
Remember these steps later when you need to import a Java program into a Java Project.
Fixing Errors
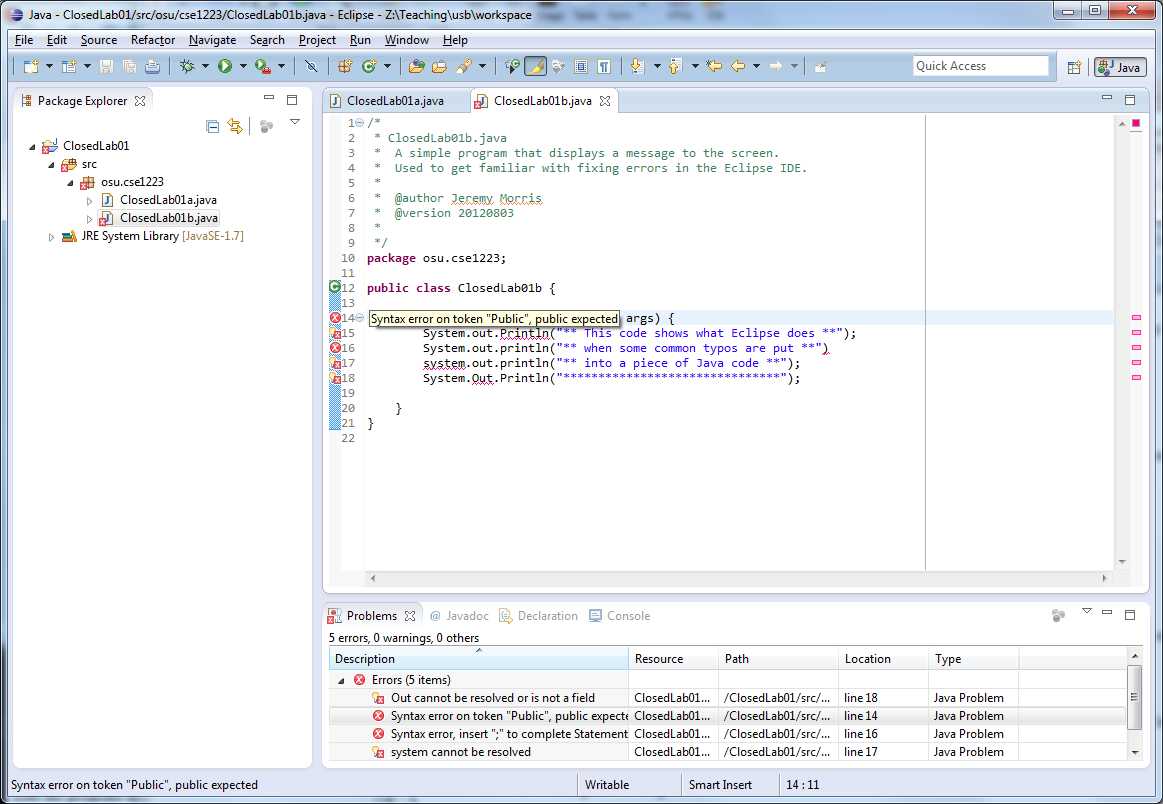
Notice all those little red X's and squiggly lines all over that imported Java program? Those are places where Eclipse has marked syntax errors. Eclipse can not only detect these kinds of errors, it can also give you advice on how to fix them. Click the Problems tab in the bottom window and the window will change from the Console to a list of errors in the code:
We can also see individual errors by placing the mouse pointer over an individual red X. The error will appear in a pop-up "tooltip" window:
Now it is your turn - fix all of the errors in the above code, save the code and then run it to display the output. If you don't remember how to run the code, refer to the instructions above.
Exercise 3 Description
A Complete Program
Now that you've seen how to create a program and had some practice with modifying code, let's make sure all of the steps are clear.Create a new program named ClosedLab01c, following the steps give above. Then look at the code below
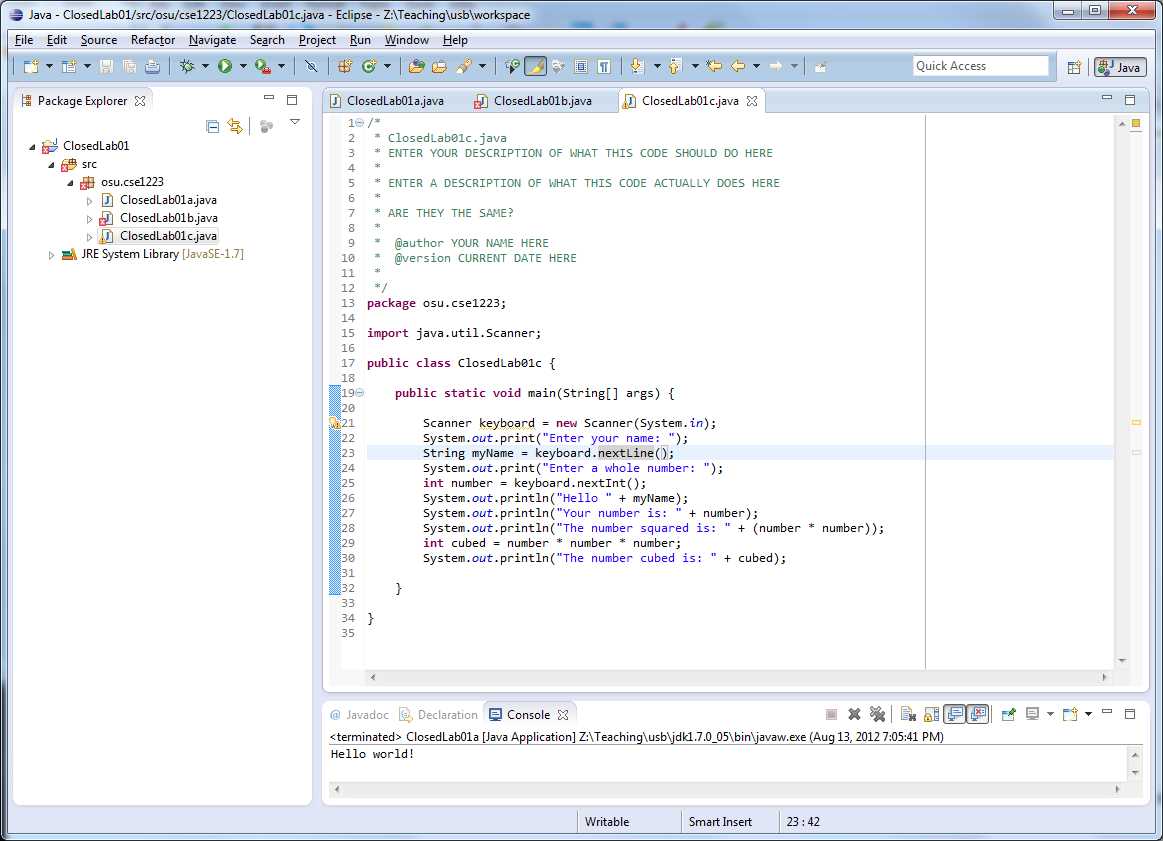
First read the code and make a prediction about what it will do. Come up with a one-to-two sentence summary of what you think this code will do.
Then in your new ClosedLab01c program created above, enter the code above. In the program header comment, replace the first line with YOUR summary of what you think the code will do before you enter the rest of the code, and make sure you replace the @author and @version entries with their appropriate values. Then enter the code for the main method and run the code.
Did it do what you thought it would do? If not, give a description of what the code actually did under your prediction and make sure you understand why your prediction was wrong. (Note that you will not be graded based on whether your initial guess was right or not, so feel free to be honest!)
Submission Instructions
All of your Closed Lab and Project submissions must be submitted to the appropriate Carmen Dropbox. No other forms of submission will be allowed.For each Lab or Project, you will need to create a single ZIP file containing the files for that lab, and then upload that ZIP file to the Carmen Dropbox. The ZIP file MUST have the same name as your Project Folder (so for this lab it will be ClosedLab01.zip).
You can submit as many times as you would like, but only the final ZIP file will be retained and graded, and your late penlaty will be determined by the timestamp of the final ZIP file. Make sure your submission is complete - we cannot get files from earlier submissions (earlier submissions are overwritten).
For this lab, your final ZIP file should contain three files:
- ClosedLab01a.java
- ClosedLab01b.java
- ClosedLab01c.java
Exporting Files From Eclipse to a ZIP file
In Eclipse, first select the ClosedLab01 Project folder, then select File -> Export. The Export
dialogue will open: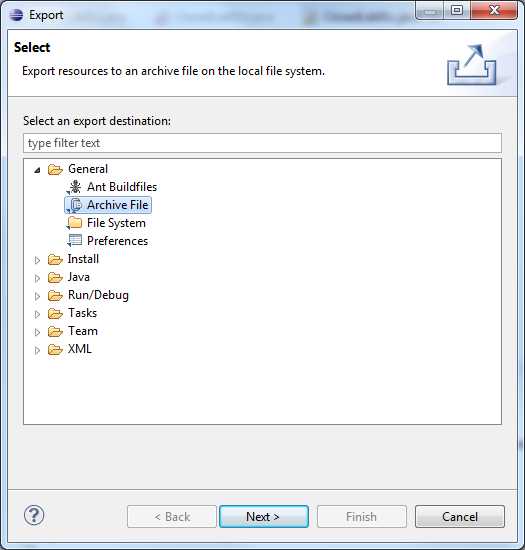
Select Archive File and click Next. Another Export dialogue window will open:
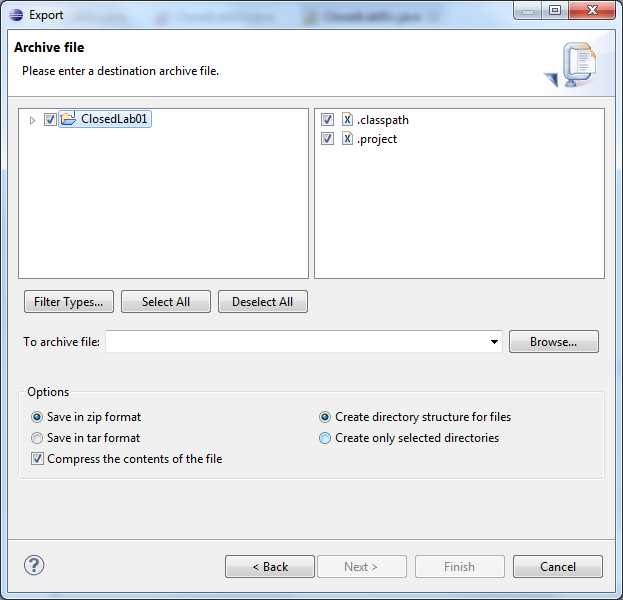
UNCHECK EVERYTHING by unchecking the ClosedLab01 folder. If you do not do this step, you will export more than just the three files we want. Then open up the ClosedLab01 folder and find the src directory in it, and check the appropriate files:
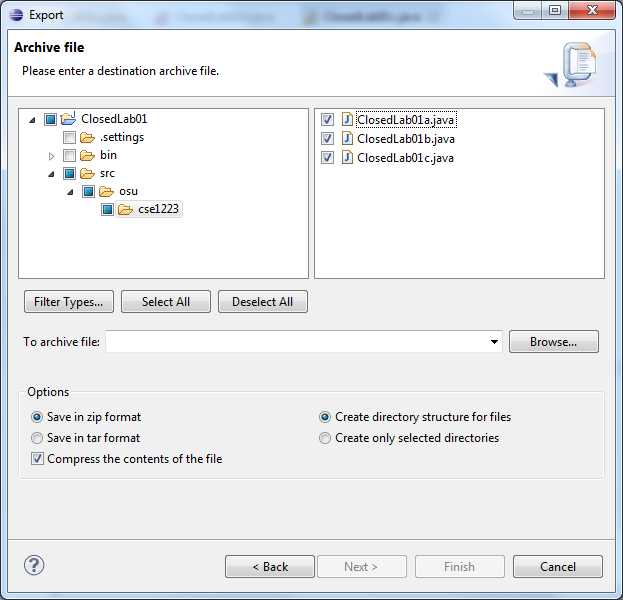
Browse to a location to save your ZIP file to and provide an archive file name for it. REMEMBER: The file name must be the same as the Project name given in the assignment. You will need to remember where you put this file so you can upload it to Carmen after the export is done (you can save it to your Desktop if you would like).
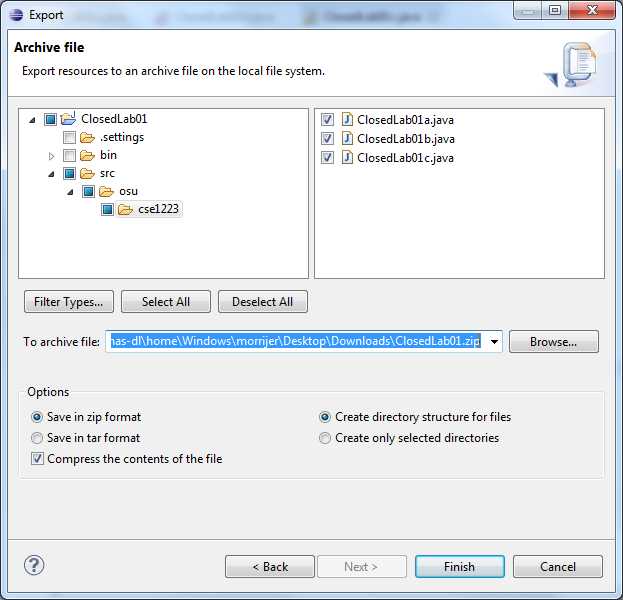
Make sure the "Save in ZIP format" button is selected and click the Finish button. Your ZIP file will be created in the location you chose.
To double check your file, find the location you saved the ZIP file to and double-click the ZIP file. You can then browse through the folders in the ZIP file to double-check that ONLY the files for the lab are in the ZIP archive.
To submit, log into Carmen and submit the ZIP file you created to the dropbox for ClosedLab01 (if the Carmen launch page is not working, you can access the Canvas website directly via this link). When you open up the Canvas Website for the course, you should see a list of options on the left hand side - click Assignments to get to the dropbox for assignments:

Click the TYPE button in the upper right hand corner to organize assignments by type:

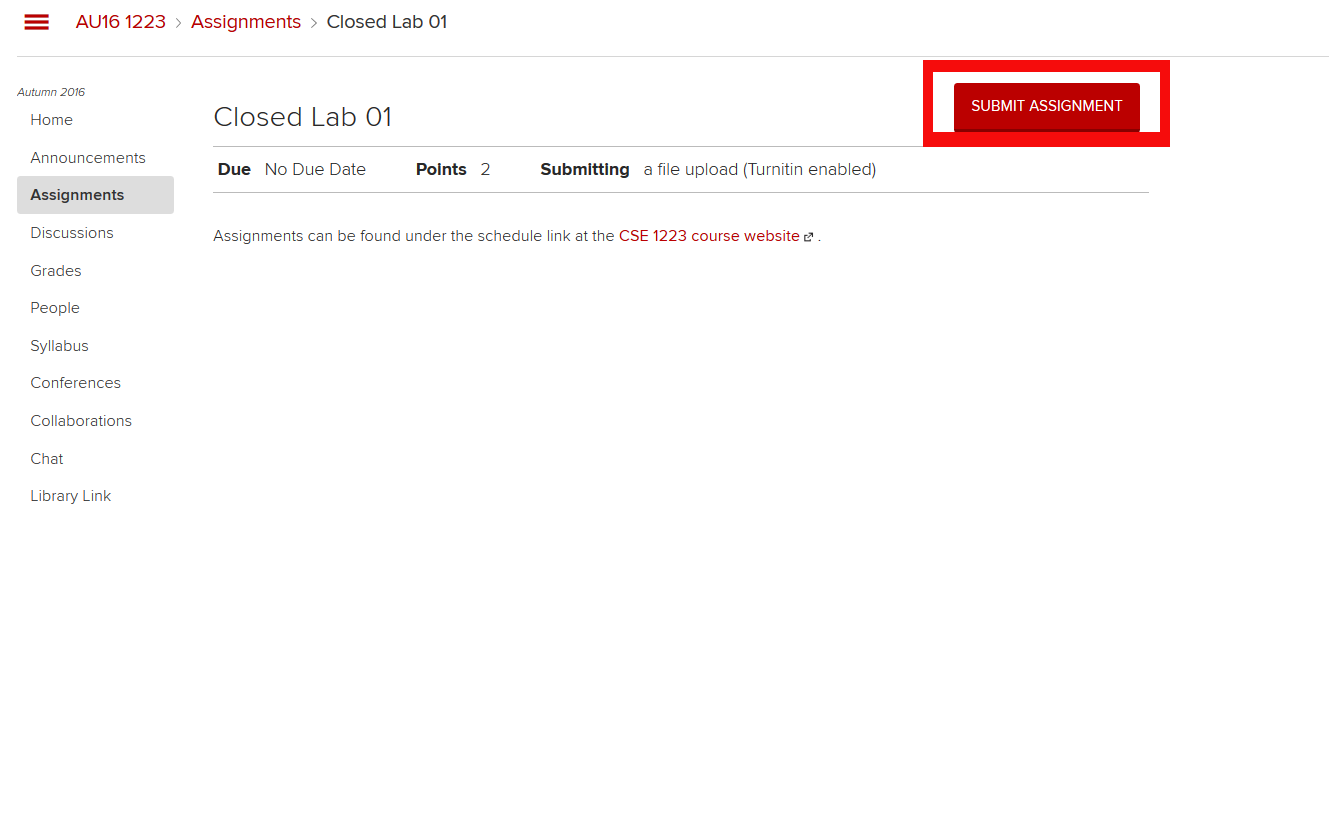
Next, scroll down the list and find "Closed Lab 01" - click on it to get to the Closed Lab 01 submission page. Then click the "SUBMIT ASSIGNMENT" button in the upper right-hand corner of the page:
In the File Upload area at the bottom of the page you can use the Browse button to find the ZIP file you exported:
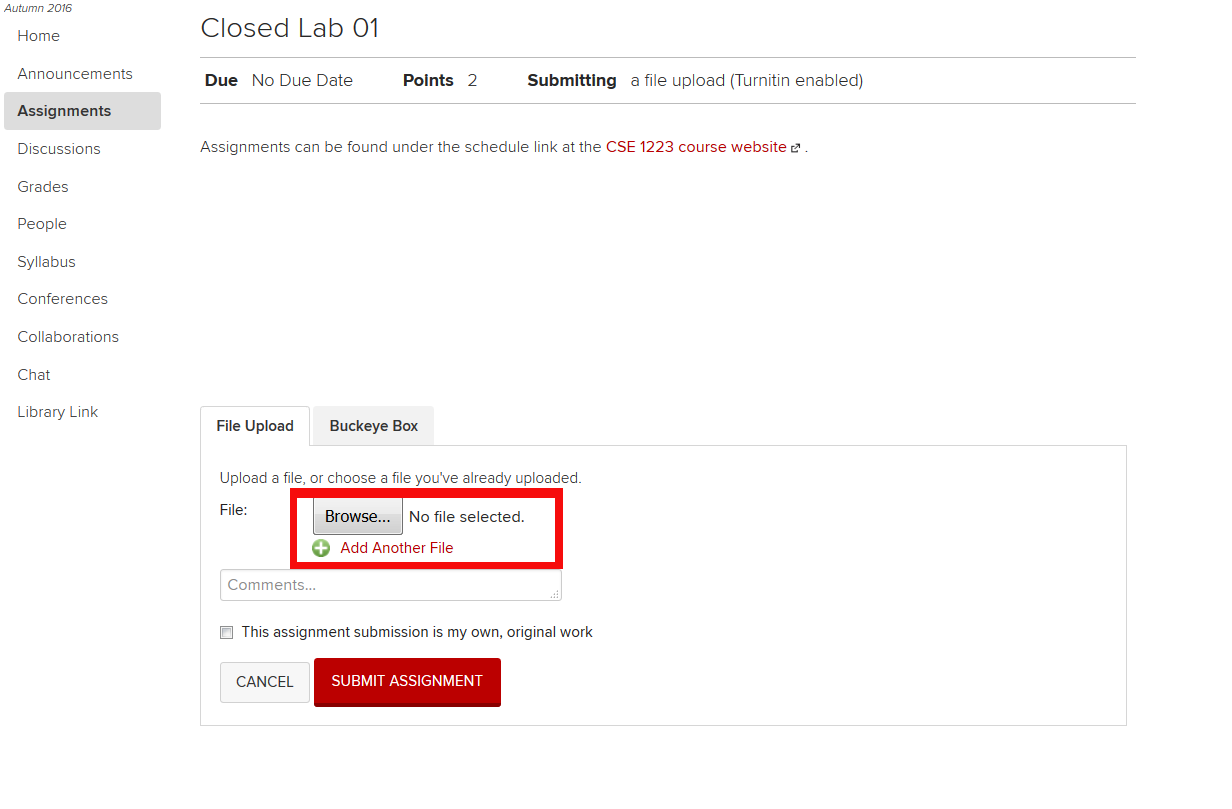
Make sure that you have clicked the check mark for the Honesty Statement - indicating that the work you are submitting is your own work - and then click the SUBMIT ASSIGNMENT button:

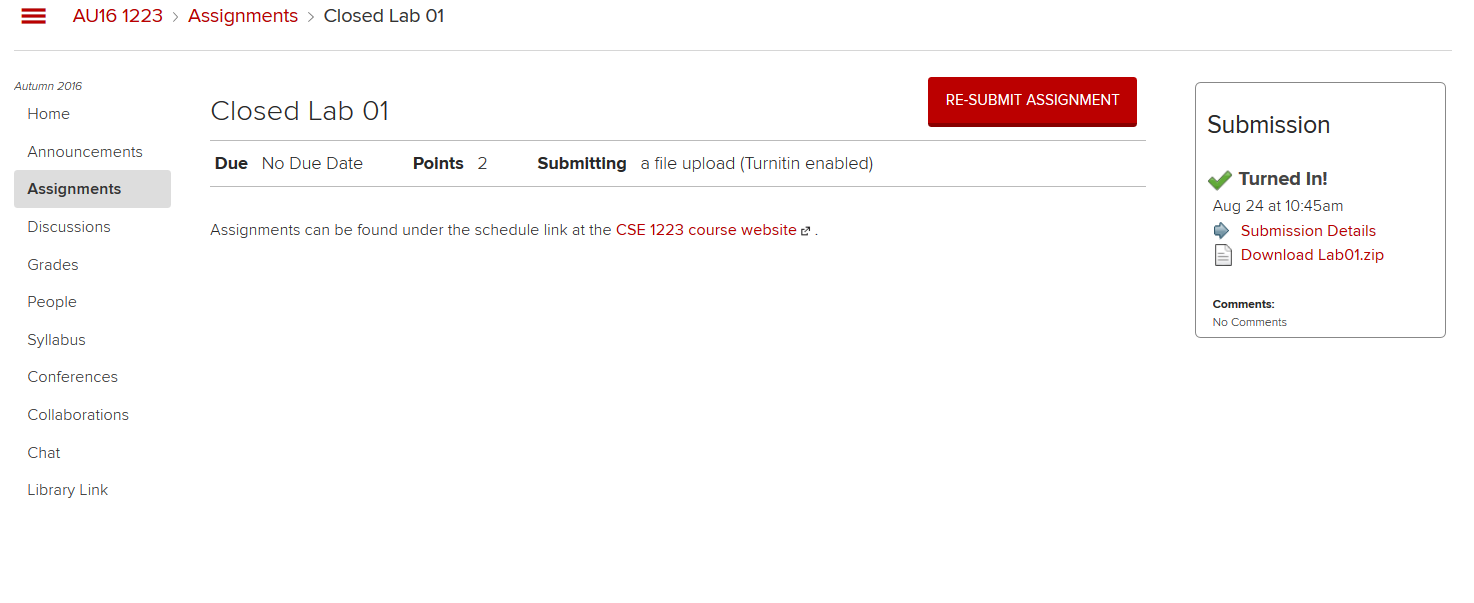
If you have successfully submitted your work, you will see a page indicating that your submission has been successfully Turned In: